
gskyer telescope manual
- Published
- in Manuals
Gskyer Telescope Manual: A Comprehensive Guide
This manual provides detailed instructions for assembling, using, and maintaining your Gskyer telescope. It covers everything from initial setup to astrophotography,
ensuring optimal viewing experiences.
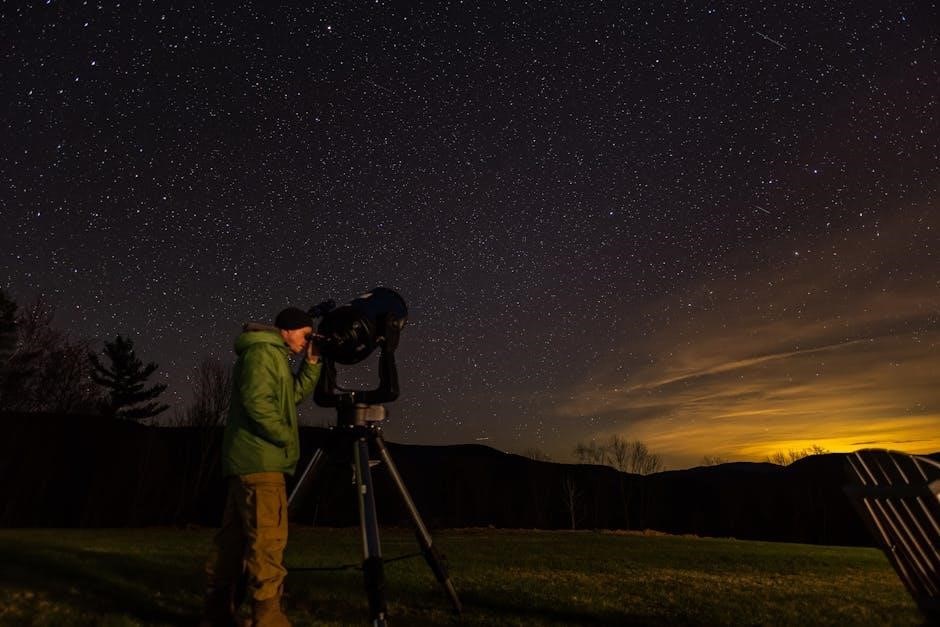
Welcome to the world of astronomy with your new Gskyer telescope! This instrument is designed for both beginners and enthusiasts, offering a fantastic entry point into celestial observation. The Gskyer telescopes, like the 70mm/400mm and 90mm/600mm models, are known for their ease of use and portability.
Many users highlight the telescope’s ability to reveal stunning views of the Moon, planets, and even brighter deep-sky objects. It’s a “passable rich field telescope,” ideal for enjoying expansive starfields. The included smartphone adapter and wireless remote further enhance the experience, allowing for easy astrophotography.
Understanding Telescope Components
Your Gskyer telescope consists of several key parts working together to bring the universe into focus. These include the telescope tube, objective lens (70mm or 90mm aperture), and adjustable aluminum alloy tripod. An Alt-Azimuth (AZ) mount allows for smooth vertical and horizontal movement.
Essential accessories are also included: eyepieces of varying sizes for different magnifications, a finderscope for locating objects, a smartphone adapter for capturing images, and a wireless remote shutter for convenience. Understanding each component’s function is crucial for successful observation.
Unboxing and Initial Inspection
Carefully unpack all components from the box, checking against the included parts list. Inspect the telescope tube, tripod legs, mount, eyepieces, finderscope, smartphone adapter, and remote shutter for any shipping damage. Ensure all lenses appear clean and free of scratches.
Familiarize yourself with each part before assembly. The telescope and tripod should fit neatly into the provided carry bag for easy transport and storage. Report any missing or damaged parts to the retailer immediately for replacement.
Assembly Instructions: Step-by-Step
Begin by laying out all components on a clean, flat surface. Assembly requires tightening several small dials, both during initial setup and throughout use, to ensure stability. Follow the diagrams closely, starting with the tripod. Attach the tripod legs securely, ensuring they lock into place.
Next, mount the telescope tube to the Alt-Azimuth mount, and finally, install the finderscope, aligning it with the main telescope for accurate object location.
Attaching the Tripod Legs
Begin by carefully unpacking the tripod legs and identifying the locking mechanisms. Extend each leg to your desired height, ensuring a stable base. Securely tighten the leg locks to prevent unwanted movement during observation. The adjustable aluminum alloy tripod allows for various viewing positions, enhancing comfort and accessibility.
Double-check that all three legs are firmly locked before proceeding to the next assembly step, guaranteeing a solid foundation for your telescope.
Mounting the Telescope Tube
Carefully align the telescope tube with the mounting bracket on the Alt-Azimuth (AZ) mount. Gently slide the tube into the bracket, ensuring a snug but not overly tight fit. Secure the tube by tightening the provided knobs or screws – remember, many little dials need tightening!
Confirm the tube is firmly attached and doesn’t wobble before continuing. Proper mounting is crucial for stable viewing and accurate tracking of celestial objects.
Installing the Finderscope
Locate the finderscope bracket on the telescope tube and gently slide the finderscope into it. Secure it with the provided thumbscrews, but don’t overtighten – you want to be able to adjust it later; Aligning the finderscope with the main telescope is vital for easily locating objects.
During daytime, point the telescope at a distant object and center it in the main scope. Then, adjust the finderscope’s screws until the same object is centered within its crosshairs.
Using the Alt-Azimuth (AZ) Mount
The Gskyer telescope utilizes an Alt-Azimuth (AZ) mount, offering simple up-and-down (altitude) and left-to-right (azimuth) movement. This intuitive design makes it ideal for beginners. Loosen the altitude and azimuth locks before moving the telescope, then tighten them to secure your desired position.
Understanding these movements is key to smoothly tracking celestial objects as they appear to drift across the sky due to Earth’s rotation.
Understanding AZ Mount Movements
The Alt-Azimuth mount operates with two primary axes: altitude and azimuth. Altitude controls the vertical movement – up and down – similar to tilting your head. Azimuth governs the horizontal movement – left and right – like panning your view.
These independent movements allow for easy pointing and tracking of objects. Remember to loosen the locking knobs before adjusting either axis, and re-tighten them for stability.
Balancing the Telescope on the Mount
Proper balancing is crucial for smooth and stable tracking. Begin by loosening the altitude and azimuth locks. Gently adjust the telescope’s position until it remains stationary in any position when the locks are released.
This ensures the mount isn’t strained, providing effortless movement. An imbalanced telescope will be difficult to control and may lead to jerky motions during observation, impacting image quality.
Locking and Unlocking the Mount
The Gskyer AZ mount features locking knobs for both altitude (up/down) and azimuth (left/right) movement. To lock, firmly tighten the corresponding knob until secure. This prevents unwanted telescope movement during observation or tracking.
To unlock, loosen the knob, allowing for smooth adjustments. Avoid over-tightening, as this can restrict movement. Regularly check the knobs to ensure they remain secure throughout your viewing session.
Eyepieces and Magnification
Understanding eyepieces is crucial for maximizing your Gskyer telescope’s potential. Different eyepieces provide varying levels of magnification, impacting your viewing experience. Magnification is calculated by dividing the telescope’s focal length (400mm or 600mm) by the eyepiece’s focal length.
Lower magnification eyepieces offer wider fields of view, ideal for locating objects, while higher magnification eyepieces reveal finer details. Choosing the right eyepiece depends on the target and atmospheric conditions.
Understanding Eyepiece Sizes
Eyepiece sizes are denoted in millimeters (mm), representing their focal length. Smaller numbers indicate higher magnification, but also a narrower field of view. Common sizes included with Gskyer telescopes typically range from 25mm to 10mm, offering varied viewing options.
A 25mm eyepiece provides lower magnification for wider views, excellent for beginners, while a 10mm eyepiece delivers higher magnification for detailed observation. Experimenting with different sizes is key to finding what works best for each celestial object.
Calculating Magnification
Magnification is determined by dividing the telescope’s focal length by the eyepiece’s focal length. For example, a Gskyer 70mm/400mm telescope with a 25mm eyepiece yields 16x magnification (400mm / 25mm = 16x). Similarly, using a 10mm eyepiece results in 40x magnification (400mm / 10mm = 40x).
Higher magnification isn’t always better; atmospheric conditions and the object’s brightness play crucial roles. Start with lower magnification to locate objects, then increase as needed.
Choosing the Right Eyepiece for Viewing
Selecting the appropriate eyepiece depends on your observing goals and the object you’re viewing. Lower magnification eyepieces (longer focal lengths, like 25mm) provide wider fields of view, ideal for locating objects and observing larger celestial features like nebulae. Higher magnification eyepieces (shorter focal lengths, like 10mm) are best for detailed views of planets and the Moon.
Beginners should start with lower power to easily find targets, gradually increasing magnification as skill improves.
Focusing the Telescope
Achieving a sharp image requires precise focusing using both coarse and fine adjustment knobs. Start with the coarse focus to bring the object into approximate focus, then utilize the fine focus for critical sharpness. Atmospheric turbulence can impact image clarity; allow time for your eyes to adjust and for stable viewing conditions.

Slow, deliberate adjustments with the fine focus knob are key to revealing intricate details. Patience is crucial for optimal results!
Coarse and Fine Focusing
The Gskyer telescope features two focusing mechanisms: coarse and fine. The coarse focus knob allows for large, rapid adjustments to quickly bring objects into approximate focus. However, it lacks precision. The fine focus knob provides smaller, more controlled adjustments, essential for achieving pinpoint sharpness and resolving subtle details.
Utilize the coarse focus first, then refine with the fine focus for optimal clarity. Remember, slow and steady adjustments yield the best results!
Achieving Sharp Images
Obtaining sharp images with your Gskyer telescope requires patience and technique. Start by ensuring proper collimation (if applicable to your model) and allowing the telescope to reach thermal equilibrium with the outside temperature. Careful focusing, utilizing both coarse and fine adjustments, is paramount.
Atmospheric turbulence can blur images; observing during periods of stable air (“seeing”) significantly improves clarity. Experiment with different eyepieces to find the optimal magnification for the viewing conditions.
Dealing with Atmospheric Turbulence
Atmospheric turbulence, often called “seeing,” significantly impacts image clarity. Air currents cause distortions, resulting in blurry or shimmering views, especially at higher magnifications. Observing during periods of stable air – typically after sunset or before sunrise – minimizes these effects.
Lower magnification can often reveal more detail when seeing is poor. Patience is key; moments of clarity can occur even during turbulent conditions. Consider location – higher altitudes often offer better seeing.
Smartphone Adapter and Wireless Remote
Your Gskyer telescope includes a smartphone adapter for astrophotography and a wireless remote shutter for convenient image capture. The adapter securely holds your smartphone, aligning the camera with the telescope’s eyepiece. Use the remote to trigger the shutter without physically touching your phone, preventing vibrations.
Ensure your phone’s camera settings are optimized for low-light conditions. Experiment with exposure and focus for the best results. Capture stunning images of the Moon, planets, and bright deep-sky objects!
Connecting Your Smartphone
To connect your smartphone, first loosen the adjustable clamp on the adapter. Carefully insert your phone, ensuring it’s securely held and the camera lens aligns with the opening. Tighten the clamp gently, avoiding excessive force. Next, insert the adapter into the telescope’s eyepiece holder, just like a standard eyepiece.
Adjust the phone’s position for a clear view. Some phones may require adjustments to the adapter’s alignment. Ensure a stable connection to prevent movement during image capture.
Using the Wireless Remote Shutter
The wireless remote shutter simplifies astrophotography by eliminating camera shake during image capture. Pair the remote with your smartphone via Bluetooth, following your phone’s pairing instructions. Once connected, the remote will allow you to trigger your phone’s camera without physically touching the device.
Position the remote comfortably for easy access. Press the button to capture images, ensuring a stable telescope setup for sharp results. Battery life varies, so keep spares handy for extended viewing sessions.
Capturing Astrophotography Images
With the smartphone adapter, capturing celestial images becomes accessible. Securely mount your smartphone to the adapter, aligning the camera lens with the telescope’s eyepiece. Utilize a stable tripod and the wireless remote shutter to minimize vibrations during long exposures.
Experiment with your smartphone’s camera settings – adjust ISO, exposure time, and focus for optimal results. Remember, patience is key; astrophotography requires practice and fine-tuning to achieve stunning images of the night sky.
Recommended Viewing Targets
Begin your astronomical journey with the Moon, revealing captivating craters and lunar features. Planets like Jupiter, Saturn, and Mars offer stunning views, showcasing atmospheric bands and Saturn’s rings. Explore bright deep-sky objects, including nebulae and star clusters, for breathtaking celestial vistas.
The Gskyer telescope excels at providing rich field views, similar to binoculars, making starfields particularly enjoyable. Remember to use low magnification eyepieces for wider perspectives and easier object location.
The Moon: Craters and Features

The Moon is an excellent starting point for Gskyer telescope users, offering detailed surface features even at lower magnifications. Observe prominent craters like Tycho, Copernicus, and Plato, noting their central peaks and surrounding ray systems. Explore the lunar maria – dark, basaltic plains formed by ancient volcanic eruptions.
Varying lunar phases reveal different shadows, enhancing crater visibility. A clear, dark sky will provide the best views, allowing you to discern subtle details across the lunar landscape.
Planets: Jupiter, Saturn, and Mars
With your Gskyer telescope, observe Jupiter’s cloud bands and the four Galilean moons – Io, Europa, Ganymede, and Callisto – changing positions nightly. Saturn’s rings are a spectacular sight, best viewed with moderate magnification to resolve the ring divisions. Mars reveals subtle surface features and polar ice caps, particularly during opposition.
Planetary viewing benefits from stable atmospheric conditions. Higher magnification reveals more detail, but requires excellent seeing and careful focusing.
Bright Deep-Sky Objects: Nebulae and Star Clusters
Your Gskyer telescope excels at revealing brighter deep-sky objects like the Orion Nebula (M42), a stunning cloud of gas and dust where stars are born. The Pleiades (M45), a beautiful open star cluster, appears as a hazy patch with several bright stars. Locate the Andromeda Galaxy (M31), our galactic neighbor, as a faint smudge of light.
Darker skies enhance visibility; use averted vision to detect fainter details.
Maintenance and Care

Proper maintenance ensures longevity and optimal performance of your Gskyer telescope. Regularly clean the optics with a specialized lens cleaning solution and microfiber cloth, avoiding harsh chemicals. Store the telescope in a dry, dust-free environment, ideally in its carry bag. Protect the optics from direct sunlight when not in use.
Periodically check and tighten screws to prevent instability. Handle with care to avoid damage to delicate components.
Cleaning the Telescope Optics
Maintaining clean optics is crucial for clear views. Use a dedicated lens cleaning solution specifically designed for telescope lenses, never household cleaners. Apply a small amount to a clean, lint-free microfiber cloth. Gently wipe the lens surface in a circular motion, avoiding excessive pressure.
For dust, use a blower brush to remove particles before wiping. Repeat if necessary, ensuring the lens is completely dry before storage.
Storing the Telescope Properly
Proper storage protects your investment and ensures longevity. After use, allow all components to dry completely before packing. Utilize the included carry bag for convenient transport and protection from dust and minor impacts. Store the telescope in a cool, dry place away from direct sunlight and extreme temperatures.
Avoid storing in humid environments to prevent fungal growth on the optics. Loosen the mount locks during storage to relieve pressure.
Protecting from Dust and Moisture
Dust and moisture are enemies of clear viewing. Always replace dust caps on the objective lens and eyepiece openings when not in use. Avoid touching the lens surfaces with your fingers. If dust accumulates, use a specialized lens cleaning brush or canned air – never abrasive cleaners.
Store the telescope in a dry location. Silica gel packets can absorb excess moisture within the carry bag, safeguarding the optics from potential damage and maintaining optimal performance.
Troubleshooting Common Issues
Blurry images often stem from improper focusing; ensure precise adjustments using both coarse and fine focus knobs. Atmospheric turbulence can also contribute – patience is key! Difficulty locating objects? Start with the finderscope aligned to the main telescope, using low magnification.
If the mount feels unstable, tighten all locking knobs securely. Remember to balance the telescope properly on the mount for smooth, controlled movements and a stable viewing platform.
Blurry Images
Achieving sharp focus is crucial for clear views. Begin with the coarse focus knob for initial adjustments, then refine with the fine focus. Atmospheric conditions significantly impact image quality; allow time for stabilization. Ensure the telescope is properly cooled to ambient temperature.
Check for obstructions or smudges on the optics. If issues persist, verify the eyepiece is securely inserted and consider trying a different eyepiece to rule out defects.
Difficulty Locating Objects
Start with bright, easy-to-find targets like the Moon. Utilize the finderscope to align with the main telescope; ensure it’s properly calibrated. Begin with low magnification eyepieces for a wider field of view, making initial locating easier.
Familiarize yourself with star charts or astronomy apps to pinpoint object locations. Remember the Earth’s rotation requires constant adjustments to track celestial bodies.
Mount Instability
Ensure the tripod is set up on a firm, level surface to minimize vibrations. Fully extend and lock all tripod legs securely. Tighten the Alt-Azimuth mount knobs firmly, but avoid over-tightening. Consider adding weight to the tripod’s central support brace for increased stability, especially with heavier eyepieces.
Avoid touching the telescope during observations, as even slight movements can cause noticeable shaking. Wind can also contribute to instability; seek sheltered viewing locations.

Gskyer Telescope Specifications (70mm/400mm & 90mm/600mm)
Gskyer offers telescopes with varying apertures and focal lengths. The 70mm/400mm model provides a wider field of view, ideal for beginners and observing larger celestial objects. The 90mm/600mm version delivers higher magnification and resolution, enhancing planetary detail. Both feature Alt-Azimuth mounts, suitable for terrestrial and astronomical viewing.
Included accessories typically encompass eyepieces, a finderscope, smartphone adapter, and a wireless remote shutter, offering a complete observing package.
Aperture and Focal Length Comparison
Aperture, measured in millimeters, dictates light-gathering ability; larger apertures reveal fainter objects. Gskyer’s 70mm model collects less light than the 90mm, impacting visibility of dim nebulae. Focal length, also in millimeters, determines magnification when paired with an eyepiece.
The 400mm focal length (70mm telescope) yields lower magnification, while the 600mm (90mm telescope) provides higher magnification for detailed planetary views. Magnification is calculated by dividing focal length by eyepiece focal length.
Mount Type and Weight Capacity
Gskyer telescopes typically feature an Alt-Azimuth (AZ) mount, enabling smooth vertical and horizontal movement – ideal for beginners. This mount is intuitive, simplifying locating celestial objects. The AZ mount’s weight capacity is crucial; exceeding it compromises stability and image quality.
While specific capacities vary, Gskyer’s AZ mounts are designed for the telescope’s weight plus accessories like eyepieces and smartphone adapters. Avoid adding excessive weight to ensure balanced and controlled tracking during observation.
Included Accessories

Your Gskyer telescope package includes several accessories to enhance your observing experience. Expect multiple eyepieces offering varying magnifications for diverse viewing. A smartphone adapter allows astrophotography by connecting your phone to the telescope, capturing stunning images.
Furthermore, a wireless remote shutter facilitates hands-free image capture, minimizing vibrations. An adjustable aluminum alloy tripod provides a stable base, and a convenient carry bag enables easy transport and storage. These accessories maximize the telescope’s versatility.
Advanced Techniques for Gskyer Telescopes
Experienced users can explore advanced techniques to optimize their Gskyer telescope’s performance. Utilizing filters can enhance contrast and reveal subtle details on planets or deep-sky objects. While collimation isn’t typically needed for refracting telescopes like Gskyer, ensuring proper alignment is crucial for sharp images.
Adding weights to the tripod can improve stability, especially in windy conditions. Focusing on low-magnification views of starfields provides a rich, immersive experience, similar to using binoculars, as recommended by experienced users.
Using Filters to Enhance Viewing
Filters significantly improve viewing quality by selectively blocking certain wavelengths of light. Lunar filters reduce glare, revealing finer details on the Moon’s surface. Planetary filters enhance contrast, making features on Jupiter and Saturn more visible. Light pollution filters minimize skyglow, improving views of faint deep-sky objects.
Experimenting with different filter types allows you to tailor the viewing experience to specific targets and atmospheric conditions, unlocking hidden details and maximizing enjoyment with your Gskyer telescope.
Collimation (if applicable)
Collimation ensures optimal optical alignment, crucial for reflector telescopes to deliver sharp images. While Gskyer refractors generally don’t require collimation, some models with combined optical systems might. Regularly check alignment by observing a star and assessing image clarity.
If necessary, adjust collimation screws carefully, following detailed online guides specific to your telescope model. Proper collimation dramatically improves image quality, revealing finer details and enhancing your astronomical observations.
Improving Stability with Weights

External vibrations significantly impact image clarity, especially at higher magnifications. To counter this, consider adding counterweights to the telescope’s tripod legs. These weights lower the center of gravity, enhancing stability and reducing unwanted shaking during observations.
Securely attach weights to designated points on the tripod, ensuring even distribution. Experiment with weight placement to find the optimal configuration for your setup, resulting in smoother, more enjoyable viewing sessions.